Quantcast
Channel: Practical experience on Oracle products
Viewing all 63 articles
Browse latest View live

ADF Mobile rebrands to Oracle MAF (Mobile Application Framework) - New Name, New Features, Growing Community!

$
0
0
Shortly after the release of ADF 12.1.3 the cross-platform mobile development framework ADF Mobile was rebranded to Oracle MAF (Mobile Application Framework). Nothing has changed on the technical foundation of that mobile framework. It is still based on Apache Cordova, HTML5/CSS3, Java, and offers the possibility to develop offline-capable apps with the help of an embedded SQLite database. The developed hybrid apps run on iOS and Android-based smartphones and tablets.
Oracle MAF (Mobile Application Framework) - Build Once , Run anyware
Oracle MAF Overview
The migration of ADF Mobile Apps to Oracle MAF runs smoothly. The migration is totaly transparent when opening the existing app in JDeveloper 12.1.3/Oracle MAF 2.0 Extension.  Excellent!

A highlight of Oracle MAF is that Apache Cordova plugins (eg barcode scanner plugins) can be integrated. The included sample apps have a showcase for reading barcodes. This is very handy! The integrated barcode scanner gives rise to many new and interesting fields of action. Hope to blog about that in more detail in near future. Stay tuned!

Oracle MAF - Finally integrated BarCode Scanner
Oracle MAF 2.0 -  Barcode Scanner Integration included


I won't list all the new features here, since it is well announced by Shay Shmeltzer here (Say hello to the new Oracle MAF) and here (Oracle MAF hits the street).

Besides the "rebranding" many new "channels" were launched, such as a forum for technical issues, a community at G+, Twitter and Facebook. I have checked all that and summarized the most important links. A lot of activity is going on! Enjoy Exploring;)

Oracle Mobile Application Framework (MAF)

Oracle Mobile Community and Forum

What others write


Using FlexSlider as Declarative Component in ADF

$
0
0
In the www there are a lot of cool photo slideshow components which one might want to use in ADF applications too. For example the FlexSlider.


Technically it should be easy to be integrated, e.g. like
..
<flexslider:FlexSlider animation="fade“ id=" fs1="" imagelist="#{someBean.imageList}" />
..

Environment

The following sample is based on ADF 11.1.1.7

How to do it

Well - in theory - it is quite simple. Take a look at the plain JavaScript/HTML Sample from http://www.woothemes.com/flexslider/ and put all necessary files in your component project which will be bundled as ADF Library for reuse. However based on your use cases (integrate inside a fragment based taskflow) there will be some challenges.
- How to deal with more then one instance on one page
- How to hook the javascript, which typically hooks into the onload javascript phase

        $(window).load(function() {
          $('.flexslider').flexslider({
            animation: "fade" /* or "slide" */
          });
        });


So here is my solution.
Step 1: Setup an ADF component project und copy all relevant files from the FlexSlider


Step 2: Next create the declarative component FlexSlider.jspx (by using the JDeveloper wizard, generate the component class and TagLibrary). The important part is to generate a unique id for the slider DIV and to make sure to call the needed javascript method to setup the slideshow. The FlexSlider.jspx looks as follows


and for the FlexSlider.java define the following methods


To make the Javascript call we use a known trick to bind the Call to a getter on an af:outputText with visible=„false“.

How to use it

Define a simple bean (or could also be a DataControl) that serves a List of Images


Drop the declarative component „FlexSlider“ from the component palette onto the given page and bind the given list via EL


As result you will get a reusable UI component to integrate slideshows into ADF applications.

Gotchas

The font resources like ttf, eot, woff, svg (that are referenced from the flexslider.css and are being used as the previous/next font-icons) are not served as expected from the ADF Library which holds the custom component. For now the workaround is to copy these resource into your master viewcontroller project. This way you make sure that all resources are loaded.

See ADF EMG Issue https://java.net/jira/browse/ADFEMG-244 for the current progress.

Download

enpit.sample.flexslider-jdev11117.zip

Annotation Driven Bean and EJB DataControls in ADF 12c

$
0
0

So as the trend of using annotations over XML configurations goes on and on in software development there is no exception to  ADF. Many developers asked for more annotations to configure metadata on Bean DataControls. Since ADF 12c finally there is support for annotations on Bean and EJB DataControls. Let's have a look on it.

Sample POJO DataModel
In my sample I am using a simple Data Model that I want to expose as Bean DataControl to check the new annotation features. We use simple POJOs „Person and a PersonService". See next figure


Next we want to see some of the annotation features in action.

Primary Key Definition
In order to make your DataModel functioning correctly in most cases you should define a primary key. You can do this now with the @Id-Annotation: (No need to generate an XML file for these kind of metadata)


(If using JPA-based entity classes make sure to use the javax.persistence.Id annotation)

Setting UI Hints
To set specific UI Hints like label, tooltip, display, width, height, autoSubmit, controlType, formatType, format, timezoneId, etc. you can leverage the @AttributeHint, @DateFormatter and @Formatter Annotations. Further it is possible to define custom properties through @Property annotations


Note a: If you set UI hints for an attribute both using annotations and in an XML data control structure file, the settings in the data control structure file take precedence. 
Note b: When you apply annotations for UI hints, you can not see the affect of the hints in the design-time view of pages that you create based on the data controls. However, you can test and verify the hints using the ADF Model Tester. 

BTW: Everything looks easy so far, but: The most challenging part for me was to recognize that these annotations only work on METHOD level and not on FIELD level although there are no compile errors! It felt natural for me to put these annotations on fields, but believe me, it won't have any effect in ADF 12.1.3. So remember

Interesting to note: The @Id Annotation works also on FIELD level!

Testing the result
Running the sample we see that the annotation driven meta data is recognized correctly. It has been applied to Table Column Headers and Form Labels, Formatters and Input-Types.


Setting AccessMode for Collections
For collections you can define the AccessMode (Scroll, Range-Paging or None).

For SCROLLABLE or RANGE_PAGING Mode to work correctly you need to implement the following method signatures (for every collection) 

List<Person> getPersons(int firstResult, int maxResults)
long getPersonsSize() 

Note: These annotations only work on getter methods.

Testing Metadata Using the Oracle ADF Model Tester 
For EJB and Bean Data Controls you can go to the DataControls.dcx file select the given DataControl and exceute „Run" from the context menu.


=> This is pretty cool. As your deployment roundtrips can be reduced ;)

Gotchas
First everything looks promising. But if you try to do some real world developer roundtrips some gotchas appear. Commenting some annotation out, testing changes etc you notice that some information are not refreshing properly inside JDeveloper. So, e.g.

Step 1: Change primary key definition

Step 2: Open DataControls.dcx

=> The change is recognized correctly by the DataControls Editor.

Step 3: Go to the  structure definition file (Person.xml)

=> The old attribute is still displayed as primary key! Expected: firstname, because of the recent changes. Hhhm. Is this a bug? It could lead to frustration and unexpected behaviour. Workaround is to close the JDeveloper application and open it again. Looks like a caching/synchronization failure.

Conclusion
The support for annotations is getting better in ADF. Besides some caching problems at design time views there is missing support for Validation. As JSR 303 (Bean Validation) is Java industry standard and widely adopted it would be cool to see ADF moving in that direction too! At this time Validations on POJO DataModel must be done in the DataControl structure files per entity. Due to the "sparse bean nature" the XML file only for the given entities needs to be generated.


Download
Sample application build with JDeveloper 12.1.3: enpit.sample.dc.annotations-jdev1213.zip

Further information

Create RESTful Services and deploy to Oracle Java Cloud Service with Netbeans

$
0
0
In preparation to one of my DOAG 2014 talks „Java WebApps and Services in Oracle Cloud" I created a new trial account for Oracle Java Cloud Service (http://cloud.oracle.com) two weeks ago. Now was the time to create a RESTful Service and deploy it to the cloud and make it accessible to public. 

Last time I tried the Oracle Cloud I used exclusively JDeveloper, this time I made my experience with Netbeans. From my point of view Netbeans has pretty good support for generating RESTService from Database tables. In a couple of minutes it is possible to create CRUD Operations and make it accesible by a REST endpoint. No matter what content type you prefer, by using JAXB XML and JSON content types are both automatically available.

Prerequites
Step 1: Create an Oracle Java Cloud Service trial account (fee less for 30 days)
Step 2: Download and install Netbeans Version 8.01 (http://www.netbeans.org)
Step 3: Make sure to install the Oracle Cloud plugin (1.5)  in Netbeans


Step 4: Download and Install (just unpack) Oracle Java Cloud  Service - Saas Extension SDK (release 14.1.12.0 Find it here: http://www.oracle.com/technetwork/middleware/weblogic/downloads/java-cloud-sdk-1848874.html)
Step 5: Next add your Oracle Cloud account as Cloud Provider to Netbeans (Goto „Services" Tab and provide your cloud account details)

Step 6: Add a WebLogic Service Instance under ‚Services Tab', so you are able to test the RESTService locally prior to deploying to Oracle Cloud. (I am not going into detail in this post for that task)

Step 7: Make sure to deploy your DB Schema objects plus data into Oracle Database Cloud Service (when subscribing to Java Cloud Service you will get the DB Service as well). See in my previous posts for more details.

HowTo develop RESTService with Netbeans
Everything is setup for cloud deployment. Now let's create a simple REST-Service on top of the HR  DB Tables EMPLOYEES and DEPARTMENTS.

Step 1: Start Netbeans, Create new Project Wizard from Type „Maven / Web Application"
Step 2: Enter your desired groupId, ArtefactId etc.

Step 3: Choose Oracle WebLogic as ‚Server' and Java EE Version 5.

Click Finish.

Step 3: Start „RESTFul Services from Database" Wizard


Step 4: Make a connection to your local database and select the desired Tables.


Step 5: Review and adapt Package-Settings if desired

Next:

Confirm your input and let Netbeans generate the source code. If you like you can make some adjustments to the generated code. Typically I would change the REST resource path. (in my sample: to „employees")


Step 6: In order beeing deployable to Oracle Cloud we need to make further some adjustments. That
is
Adjustment 1: web.xml
(1) We need to change the servlet class from org.glassfish.jersey.servlet.ServletContainer to com.sun.jersey.spi.container.servlet.ServletContainer because the prior class is not available on the cloud server. (2) Further add an <login-config /> if you want to make the Service publicly (without authentication) available.

Adjustment 2: weblogic.xml
Add a library reference to jax-rs 1.1
Adjustment 3: persistence.xml
Configure your Cloud DB Service name as JNDI Data Source


Deploy RESTService to the cloud

Step 1: Open Project Properties, Choose ‚Oracle Cloud Remote" Server Type, Java EE Version 5

Step 2: Execute ‚Run'
The cloud deployment will start...

The WAR file will be virus scanned...
And Finally deployed to the cloud.

Test the cloud RESTService
If using Chrome install the Postman extension to test the Service. e.g. to test different content types. JSON, XML
….


Administer Oracle Java Cloud Service from within Netbeans
Right under the Service Tab your able to Open the Apps, Start, Stop or Undeploy.

To view the Job Status and Logs open the corresponding view from the Oracle Cloud entry.


Troubleshooting
If something goes wrong open the Cloud Job View and Logs Tab to check the details, e.g. if a deployment fails. (1) ClassNotFound Exception

Solution in that particular case is: Use com.sun.jersey.spi.container.servlet.ServletContainer instead of org.glassfish.jersey.servlet.ServletContainer.

(2) java.lang.AbstractMethodError: javax.ws.rs.core.UriBuilder.uri(Ljava/lang/String;)Ljavax/ws/rs/core/UriBuilder

Solution: Somehow the generated POM had a fixed reference to JAX-RS Library which is provided from the cloud server. So I changed that dependency

Conclusion
- Having everything setup (Cloud SDK, local WebLogic Servece, DB Objects in the Cloud Service) it is quite easy to build and deploy RESTful services.
- Why is the SDK not bundled with the Netbeans Oracle Cloud Plugin?
- I wish there would be that kind of wizard (RESTful Services from Database) for JDeveloper ;)


Further Information
- See also: http://www.oracle.com/technetwork/articles/java/enterprise-cloud-2227135.html (Build with NetBeans IDE, Deploy to Oracle Java Cloud Service)

ADF 12c Deck component Overview & Programmer examples

$
0
0
This year the german ADF Community resumed with "ADF Spotlight" - a series of 30 min Webcasts. It was my turn to give use cases and a programmers overview for the ADF 12c deck component. Since I like to share with the international community I made an english version of the few slides.


Download Sample: enpit.sample.adf1213.deck-jdev1213-v2.zip (It contains the use case for Image -> Detail and Slideshow)

Further information


Oracle ACE Director Confirmation and Fusion Middleware Forum 2015 in Budapest

$
0
0
I am happy to say having been nominated as Oracle ACE Director and being accepted lately. Big thanks to the ACE Program and everyone who was involved and made this happen.  I feel really honoured! It motivates me to participate and contribute more with the community.

It is challenging doing the daily business, taking time for conferences, writing blog posts, sharing Oracle FMW Content through social media channels, enjoying free time with family, etc.  Anyway whenever time permits I will try to continue with content contribution for Oracle ADF,  WebCenter, WebLogic, Cloud Services, MAF! Hope you enjoyed my existing posts so far and will enjoy it in future :) @oracleace thanks for the nice welcome gifts!


Find my ACE Profile page here.


Oracle Fusion Middleware Forum 2015

This year I am going to attend the annual OFM Forum in Budapest with lots of great presentations and Hands-On. It is organized by the SOA Community (led by Jürgen Kress). I am looking forward to meet with the community and see what Oracle plans for the upcoming FMW & Cloud Services.

SOA Suite 12c & Integration Cloud Service
BPM Suite 12c & Process Cloud Service
Mobile & Development tools & Mobile Cloud Service
WebLogic 12c & Java Cloud & Developer Cloud Service


There are 6 days left to register ;)
March 3-4, 2015, 10:30 AM - 5:00 PM
Check out the Agenda and Registration!


More Information


#ofmForum 2015 in Budapest has rocked!

$
0
0
Last week I attended the Oracle Fusion Middleware Partner Community Forum 2015 in Budapest. Over 150 participants from Europe, US and even Latin America (Peru, Costa Rica, Mexico, Venezuela) joined the great event where various Oracle Product Managers and Oracle Partners exchanged their experiences with the community. Jürgen Kress  - well known from his soacommunity& weblogiccommunity blogs - and his team hosted a great event at a great location! Thanks a lot!

The Digital Transformation is just starting

We got an update about Oracles overall cloud & mobile strategy that drives the digital transformation. Nowadays there is a huge demand on business agility due to disruptive technologies and market shifts.

Oracles answer to these requirements are the upcoming Cloud Services

  • Integration Cloud Service (ICS)
  • Process Cloud Service (PCS)
  • Mobile Cloud Service (MCS)
and SaaS solutions running on Oracles PaaS (Database Cloud Service, Java Cloud Service). The main focus for the upcoming releases for  Oracle SOA/BPM/ACM 12c is on stability & improvements.

The nice thing about the ofmForum is that there wasn't just slides but on the most products real working demos. On day 2 there were 3 parallel tracks dedicated for SOA, BPM/ACM and WebLogic&Mobile. The experts gave demos on API Catalog, API Manager, StreamExplorer, Event Processing, Mobile Alta UI & OSB Integration for SOAP to REST transformations, MAF, ICS, PCS, MCS and the Java Cloud Service (JCS) plus Developer Cloud Service.  Really a lot of new acronyms to learn ;)

Day 3/4 was dedicated to 4 parallel Workshops with a lot of hands-on sessions. (SOA, BPM/ACM, Mobile Application Framework (MAF), Multichannel Enablement). I attended the Multichannel workshop. Based on an existing  SOAP-Webservice we used OSB 12c to transform it (without coding) to a REST JSON based service. On top of that we built a mobile app with MAF. In the end I had a running MAF application on my real iOS device.


Networking & Get-together

Besides the cool and new technologies there were a lot of chances to network and get in touch with Oracle Product Managers and Partners. I enjoyed it a lot meeting persons I only knew from twitter or blogs. Thanks for all the great conversations! Further, Budapest is an amazing city! Good food, wine & bars and historical locations. Thanks Jürgen and Oracle for the nice dinner in the spoon restaurant. And if you are in Budapest check out the Simpla Kertmozi, a pretty cool "ruin bar":)


I am really looking forward for the next OFM Forum 2016. Which location will be next?

Further information

See more cool pictures of the event in the twitter stream #ofmForum

Java Cloud Service Webcast on April 24th 2015

$
0
0
[Source: Oracle]
Oracle Java Cloud Service is a part of the platform service offerings in Oracle Public Cloud Services. Powered by Oracle WebLogic Server, it provides a platform for developing and deploying new or existing Java EE applications.

Schedule: April 24th 2015 15:00-16:00 CET (Berlin time)
Presenters: Cosmin Tudor and Jürgen Kress
Registration: register here

In this webcast Cosmin & Jürgen  will provide both an overview presentation and a short demo that will cover the new Oracle Java Cloud Services - Platform as a Service offerings and the integration with other Oracle Cloud offerings like: Developer Cloud Services, Database Cloud Services, Documents Cloud Services ...

In about 1 hour the following topics will be covered:
  • Java Cloud Services:
    • Java Cloud Services PaaS and PaaS – Virtual Image
    • Java Cloud Services SaaS Extensions
    • Management and Administration:
      • Provisioning
      • Backup and Recovery
      • Patching
      • Scaling
      • REST API
    • Coherence Cloud Services
    • Storage Cloud Services
    • Compute Cloud Services
  • Developer Cloud Services
  • Database Cloud Services

Looking forward to it! Hope to see you in the webcast!


ADF DVT NBox visualisation component in ADF 11.1.1.9

$
0
0
With the arrival of ADF 11.1.1.9 a new visualisation component is included. The NBox.
"The ADF NBox is an interactive data visualization tool that allows users to view data displayed in a grid across two dimensions, each dimension representing a range of data. Customizable nodes representing data items are displayed in the cells formed by the intersection of the two dimensions." (Source: Oracle Documentation)
I never heard of the NBox before so I had to give it a try. I am quite impressive so far! Take a look

Use Case Description

In my sample for the NBox component I would like to display Employees on the dimensions „Origin“ (Country) and „Income“ (Salary).

How To

Step 1: Create a Read-Only ViewObject on the HR.EMP_DETAILS_VIEW Database View. That View includes all needed data for the use case. Nothing special here. So I am not going into details.

Step 2: Create a transient attribute to calculate the salaryLevel (lower, middle, upper - so that’s just my simple idea to divide Employees into 3 Salary-Groups so to say). I am doing this by a groovy expression: "Salary < 5000.0 ? 'lower' : (Salary < 10000.0 ? 'middle' : 'upper‘)"


Step 3: Create transient attribute to calculate an CountryDiscriminator. My idea here is to categorize every employee by the following Country-groups: US, UK and „Others“. To achieve that I am using the following groovy expression: "CountryId in ['US', 'UK']?CountryId:’OTHER'"


That’s all you need on the model side. The rest is done on the UI Layer.

Step 4: Open the „Data Controls“ palette and drag&drop the Collection „EmpDetailsView1“ onto the view (JSPX). Choose NBox from contextual menu.


Dialog opens to configure the Rows und Columns. Enter the column und row numbers, assign values and labels. In this example there are exactly 3 rows and 3 columns. The values should exactly match your values from the transient attributes.


Click: Next

The NBoxes nodes are going to be „Employee Names“ Each node will be stamped by the SalaryLevel (for income dimension) and CountryDiscriminator (for origin dimension)

In the Node-tab define the grouping by „JobTitle“. Choose color as Node classifier.


Click Tab: Indicator
Define the grouping by ‚DepartmentId“. Choose „Shape“ as indicator. (color is already used for the Job title classification)


Click: Finish-Button

The generated JSPX code will look like the following snippet. The data is bound against a tree binding.


Conclusion

The NBox component is quite rich. With some basic understanding it is very easy to transform data into meaningful and easy to read information! Beyond the given use case there are a lot more ways to visualize data. It’s worth to take a look into the documentation. Have fun!

Download Sourcecode

https://github.com/enpit/enpit.sample.adf.nbox

Further Information

From ADF Web UI Guide 11.1.1.9
- 23.2.3 NBox Use  Cases and Examples
- 26  Using NBox Components

From ADF Fusion Developer Guide 11.1.1.9
-  26.5 Creating Databound NBoxes

Issues

(1) As you can see from the screenshot of the „Create NBox“ dialog the „Next“-Button is disabled although everything required is filled in. The Button gets enabled once you click in some of the cells.
(2) In the second step of the „Create NBox“ sample the „Back“-Button is disabled although there is no reason. Workaround: fill in both required fields Row/ Column. Then the Back-Button gets enabled.

Getting Started with Oracle Mobile Cloud Service (MCS)

$
0
0
Mobile Application Development is often reduced to the tasks needed for implementing an app using some mobile framework like iOS, Android, Oracle MAF or some other hybrid framework. In reality there is a lot more work to do for making a mobile to work: manage user access, creating services, handle push notifications, monitor usage, etc etc.

Oracle Mobile Cloud Service (MCS) provides a central cloud service for developing, deploying, maintaining, monitoring, and analyzing your mobile apps. From the architecture perspective it looks like the following


To get started check out the MCS Introduction video from the Oracle Mobile Youtube Channel.

In the next posts I am going to show some of the features and how to work with Oracle Mobile Cloud Service. Stay tuned!

To get started smoothly I have put together the most useful content around Mobile Cloud Service.

Useful Learning Resources


Documentation


Tutorial


Setting up a Mobile Backend in Oracle Mobile Cloud Service (MCS)

$
0
0
A mobile app typically needs to access some services from the outer world. That might be some generic services for user management, storage/database, notifications, etc. (so called Platform APIs) or some business domain/app specific APIs - called Custom APIs.


In Oracle Mobile Cloud Service all services are exposed through a mobile backend. The mobile backend can be versioned and is associated with a User Realm. To access services from a mobile backend the app needs to know the unique ‚mobile-backend-id‘ and the app must be registered with the mobile backend. That registration is done in the settings of the mobile backend from within the MCS UI. So in short: the mobile backend acts as a secure container for APIs.

Creating and Configuring a Mobile Backend

Step 1: (Prerequisite) Setup User Realm with Users And Roles. Checkout the Getting Started on User Management or  the MCS Video on "Defining Users and Properties in Realms". It is pretty straight forward. The focus in this post is on mobile backend.

Step 2: In MCS goto „Development“ > Mobile Backends
Click „New Mobile Backend“ to open the wizard

Enter a name for your backend and click „Create“.
Next you will be navigated to the „Settings“-Tab of the newly created Backend.


In the settings the information is displayed which is needed in order to connect an app through this mobile backend:  Base URL, Backend ID, Anonymous Key (for anonymous access) and Application Key. For each registered application a new application id is generated.

Step 3: Associated Mobile Backend with a user realm
By default every newly created mobile backend is associated with the Default Realm. To change this open your mobile backend in MCS and goto „Users“ and Choose „Change User Realm"


Step 4: Add Custom APIs
Open your mobile backend and goto APIs

Now you can select an existing custom API or create a new API on the fly.
„Select APIs“ takes you to the API Catalog to select an API


Click on the „+“ to add the API to your mobile backend. In this sample the HR API will be associated with my HR Mobile Backend.

That’s all for a basic mobile backend.

Test the mobile backend

(1) Right from within MCS it is possible to make a first test on the API


(2) Because everything in MCS mobile backend is exposed as REST service you can simply use cURL for quick tests, e.g.

$ curl -i -u username:password -H „oracle-mobile-backend-id: c3a65860-f3a8-XYZ2-af44-061b8dc6143c" -H "Content-Type: application/json;" --request GET http://:7201/mobile/custom/hr/employees

HTTP/1.1 200 OK
Date: Fri, 24 Jul 2015 16:45:53 GMT
Transfer-Encoding: chunked
Content-Type: application/json
Oracle-Mobile-Test: Response Generated from RAML
oracle-mobile-runtime-version: 15.3.3-201507070814
X-ORACLE-DMS-ECID: 155856d5d1d09189:53b26884:14ebd8aed21:-8000-000000000000d67e
X-Powered-By: Servlet/2.5 JSP/2.1
Set-Cookie: JSESSIONID=BnjQVyrB6vhWKQhsR1pYsrkbQnQXwR2ZRD5NJ5QlTWNKPhQ4hXjn!15090744; path=/; HttpOnly


Connect to the mobile backend

Next you can go in your mobile app development environment to code against the mobile backend. For iOS and Android there are MCS SKDs available. You can download them right from the MCS Portal. Check out the user guide how to connect with the specific SDKs (see links below).

Interesting to note: For Oracle MAF no special MCS SDK is available. But stay tuned - there will be some MAF MCS Utilities available shortly with support for MCS. Further more there is an MCS SDK for Xamarin which is great news. Checkout the Xamarin Oracle Mobile Cloud Service SDK 1.0. It shows the MCS might have a bright future for enterprise mobile backends. I hope to see it!

What's next? Design and Implementation of Custom APIs for the "mobile service developer" and consuming the Services for the "mobile app developer".

Further information


Designing Custom APIs for Oracle Mobile Cloud Service (MCS) right from the Browser

$
0
0
One of the powerful and cool new features in Oracle Mobile Cloud Service is the hub for Custom APIs. From the architectural perspective Custom APIs are consisting of two parts: The „Design“ and „Implementation“ Part. In this post I am going to focus on the first part.

Within MCS it is possible to create the API interface right in the browser or by uploading a so called RAML document that describes the API resources. Having done this you can provide some sample data being able to test and implement against the newly created API.

Focus of this post is to show how to design an API right in MCS UI and test it.

How to do it

Goto Development > APIs

Click „New API"


If you have a RAML document at this point in time you can upload it to define the Resources for your API. If not it is possible to create it on the fly (as shown in this post).

Next: Click „Create“. It will take you to the „Designer“ View. You will see the general configuration of your Custom API.

Next Step is to create a new REST Resource which is done in the „Endpoints“ section

Clicking on „New Resources“ creates a new form entry to fill in the „path“ and a Resource „Display Name".

Having done this the desired methods (GET, PUT, POST, etc) should be defined. Click „Methods“ for that and take action form the select list of possible methods.

-

As seen from the screenshot above you can further refine the GET method with parameters etc.
In order to get a specific employee record you may want to create a „sub-resource“ wich is also supported by the MCS API Designer. Click on the ‚+‘ therefore

The nested resource is dynamic (employee_id in this case)

And of course same procedure to add methods to a nested resource

See result after adding the GET method to a nested resource.

Because the app developer might want to be able to implement against the new API early in development (without fully functional API service backend) you can provide some testdata in the „Responses“ tab.

Choose „Add Media Type“ -  application/json - and paste your example/test response.

Save your work. Click on the „Test“ Button on top-right.

Choose the desired resource to test. You will be prompted to fill in a sample id for „employee id“ - path parameter and associate with some mobile backend. Provide Username/Password except you configured the API for anonymous access (security tab, not covered here)

Click on „Test Endpoint“ to see the HTTP Status code + body result.


That concludes the basic steps needed to design and test a Custom API in MCS. 
Cool stuff!

Further Information


ADF 12cR2 (12.2.1) with lots of new features available - as part of Fusion Middleware 12.2.1 release, including WebLogic, SOA, WebCenter and Forms/Reports

$
0
0
Just before Open World 2015 & JavaOne open its doors for Oracles annual conference in San Francisco the long awaited ADF / WebLogic 12.2.1 has been released as part of Fusion Middleware 12.2.1.


The most interesting Updates to JDeveloper & ADF & WebLogic in terms of platform are

  • It runs on JDK 1.8. JDeveloper supports 1.8 features
  • Full Java EE 7 Support
  • Integration with Java Cloud Service (not only SaaS Extention and Developer Cloud Service, git etc)
  • Better Maven integration
On the feature list of ADF 12.2.1 there are mainly these cool things available
  • REST Service DataControl + REST from ApplicationModules
  • Responsive Layout features (af:matchMediaBehavior) and new Responsive Template (Masonry layout)
  • Remote Regions - Consume Taskflows remotely
  • Improved Data Visualization components

I am really looking forward to try out the many new features.

Further Information


Oracle JET is here - for JavaScript lovers

$
0
0
Oracle makes a big move towards client side HTML5 enterprise application development - based on a collection of proven open source JavaScript tools: Oracle JET - the JavaScript Extension Toolkit. After 3 years of active development and internal usage for its Cloud products at Open World 2015 it has been made publicly available.

To get a feel of an Oracle JET application check out the "WorkBetter" JET Demo:
 Oracle JET Demo Application

Oracle JET provides a rich set of Oracle JET UI components that you can use out of the box (based on Alta UI). The documentation contains code snippets which can be used to integrate the desired UI controls in your application. (If you are a business user (with a certain affinity and love for IT) you will be able to use Oracle JET components inside "Oracle Application Build Cloud Service" )
 Oracle JET UI Components

For data visualization it is almost the complete set you may know from ADF. This is pretty cool.

Oracle JET (Enterprise) Features

Comparing to other UI Toolkits it is great to see that important aspects of every enterprise application has been addressed.

  • Support for localization & internationalization
  • UI Components are implementing the latest WCAG 2.0 / WAI-ARIA accessibility guidelines
  • Theming support - Default is Alta UI
  • Security - Oracle JET API provides the oj.OAuth authorization plugin which supports the OAuth 2.0 open protocol

Oracle JET Technical Base

Obviously the core of Oracle JETs stack is based on HTML5 / JavaScript / CSS3. For certain aspects it uses proven JavaScript Libraries for Binding, Templating and Modularization.


How does it compare to ADF

Well,
Oracle ADF Faces - for Java developers looking for a set of JSF components implementing Alta UI
Oracle JET - for JavaScript developers looking for a set of components implementing Alta UI

In the Javascript ecosystem there are a lot of changes. If you do not want to deal with all of that ADF is the right choice. If you love Javascript and want to embrace every new JavaScript libraries then Oracle JET is for you.

Further Information on Oracle JET

I have put together most of the interesting things to get started on Oracle JET. BTW, For next year it is announced that it is going to be available open source on GitHub!

Oracle JET - Getting Started
http://www.oracle.com/webfolder/technetwork/jet/globalGetStarted.html

Oracle JET Quickstart Basics
http://www.oracle.com/webfolder/technetwork/jet/public_samples/OracleJET_QuickStartBasic/public_html/index.html

Oracle JET UI Controls Overview
http://www.oracle.com/webfolder/technetwork/jet/uiComponents-formControls.html

Oracle JET Hands On Lab
http://www.oracle.com/webfolder/technetwork/jet/globalExamples-HOL.html

Oracle JET Developers Guide
http://docs.oracle.com/middleware/jet112/jet/developer/toc.htm

Oracle JET Community
https://community.oracle.com/community/development_tools/oracle-jet

Oracle JET Quick Demo on Youtube
https://www.youtube.com/embed/Qf7s-VVVpwo

Oracle Alta UI
http://www.oracle.com/webfolder/ux/middleware/alta/index.html


Keep up to date with Oracle JET

Oracle JET YouTube Channel
https://www.youtube.com/channel/UCcPYy1QhTNyR6fPAGLEsSTw/feed

Oracle JET on Twitter
https://twitter.com/OracleJET

Oracle JET on Google+
https://plus.google.com/111856587728259117930

Consume JSON based ADF REST Services in ADF 12.2.1 (with REST DataControl)

$
0
0
In ADF 12.2.1 the capabilities for handling with REST services has been greatly improved. You can now expose ADF BC (ViewObjects) as  REST service in JSON format.  On the other hand there are improvements in the REST DataControl.

In this blog post I am going to show how to consume this REST Service and create a basic ADF Table.

So here is a basic REST Service for employees


REST DataControl with JSON Support

From „New Gallery“ open the following wizard


The create web service data control wizard launches. Choose REST option.


Next you can decide whether you consume a REST service, that has been exposed through ADF BC Application Module or a generic REST service. The difference here is that the ADF based REST service exposes additional meta data that describes the structure and types of the return JSON structure. This makes it possible to automatically get a type-aware DataControl on REST/JSON service which is generically not the case. See next screenshot to get a feel of the feature of an ADF REST Service and this particular describe feature.


So lets add an ADF REST Connection


Important note: Do include the version name and resource name, but do not include any URL parameters.

Next it is possible to choose from Security Policies

Since in this example we do not use any security just skip this page.

Next you can choose to add all resources or specific one. in this case I have only one resource exposed


Click Next and Finish.

=> The DataControl will be created. Every attribute type is correctly derived from the rest metadata (ADF REST service specific).


(Interesting to note, that EmployeeId is not marked as the primary key. Although it is in the ADF BC ViewObject definition from which the service has been previously created. Well it is because of the REST nature of this Collection. Resources typically must not match every attribute of an ADF ViewObject. It could be a subset. Therefore the canonical attribute represents the primary key which is typically the URL to the canonical resource. In our case the canonical resource is the resource itself :))

Next steps are as easy as with any other DataControl. Just create an ADF table via drag and drop

Run the page.


Table is displayed. Filtering works BTW too. Nice.

Since we are consuming an ADF REST Service lets see if we can update a record. Therefore Drag and Drop the „Commit“ Operation from the Data Control. Create a button and name it „Save changes“. For a simple testcase we change the salary from initially 10000 to 5000. Press „Save changes"


Looking into the database you will notice the change


Pretty cool.

Issues

Removing the Filter results in an NullPointerException. Hhhm that is disappointing. Looks like nobody has tested this so far ;).


Refreshing the page the table keeps empty (Not data to display). Looks like a bug. It would not surprise me. Anyone feel free to file a SR to Oracle.

Sample applications

Provider: enpit.sample.adf1221.restprovider.zip
Consumer: enpit.sample.adf1221.restconsumer.zip

Further information

ADF 12.2.1 Developers Guide:

16.3.1 How to Expose Canonical Resources in the ADF REST Resource
22 Consuming RESTful Web Services Using the ADF REST Framework


WebLogic 12.2.1 on Docker

$
0
0
Probably everybody in IT has noticed the rising of Docker in last 2 years. Since March 2015 Oracle has certified WebLogic Server on Docker. This is good news. Beyond all buzz around containerization and Docker in particular there is great use for it. Especially during development or testing of an application for WebLogic you can benefit without too much investment (time, skills). Further, since the first day of WebLogic 12.2.1 release it is certified on Docker.

In preparation for one of my last talks lately I decided to checkout this new version. Subsequently are my experiences so far.

Using the following Environment: WebLogic 12.2.1, Mac OS 10.11 , Docker 1.9, Docker Compose 1.5 . I will not go into Docker details here. There is a lot of introductorily Docker content available on the web.

WebLogic on Docker Overview

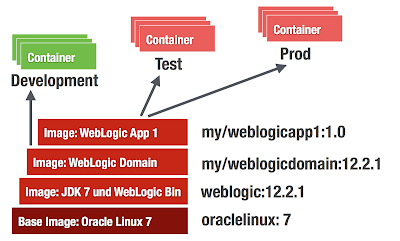
There are no prepackaged WebLogic Docker images available (basically because of user licence agreements) so the images must be build manually from Dockerfiles (provided at GitHub). The following figure shows the needed layers of images to actually start running containers.
  • oraclelinux image - officially available from Docker Hub
  • weblogic binaries image - must be build from Dockerfile (Available on GitHub)
  • weblogic (empty) domain image - must be build from Dockerfile (Available on GitHub)
  • application image - must be build from custom Dockerfile (its your turn)

Prerequisites

  1. Learn some Docker basic skills (if it is new to you)
  2. Download Docker Toolbox 1.9. It exists for Linux / Windows / Mac. It makes you getting started "to docker" in seconds. (On Win / Mac it installs VirtualBox if needed)
  3. Git Clone https://github.com/oracle/docker/tree/master/OracleWebLogic (Update 12/20/15: it has been updated to https://github.com/oracle/docker-images/tree/master/OracleWebLogic
  4. Download JDK 8u60 http://download.oracle.com/otn/java/jdk/8u60-b27/jdk-8u60-linux-x64.rpm
  5. Download WebLogic 12.2.1 Binaries (I am building the DEV/QUICK Version here. So it is: fmw_12.2.1.0.0_wls_quick.jar)
  6. Copy the JDK / WLS Binaries into the cloned workspace /OracleWebLogic/dockerfiles/12.2.1

How To: Build WebLogic 12.2.1 Developer Image

dockerfiles ak$ sh buildDockerImage.sh -v 12.2.1 -d

Building image 'oracle/weblogic:12.2.1-dev' based on 'developer' distribution...
Sending build context to Docker daemon 1.204 GB
Step 1 : FROM oraclelinux:7.0
7.0: Pulling from library/oraclelinux
f359075ce4d8: Pull complete
..
..
Successfully built 251b87118c43

WebLogic Docker Image for 'developer' 12.2.1 is ready to be extended: oracle/weblogic:12.2.1-dev
dockerfiles ak$ docker images
REPOSITORY                    TAG                 IMAGE ID            CREATED             VIRTUAL SIZE
oracle/weblogic               12.2.1-dev          234ea4e45bc7        44 hours ago        1.738 GB
oraclelinux                   7.0                 707f44423637        7 weeks ago         197.2 MB


How To: Build WebLogic 12.2.1 Sample (Empty Domain) Image

This is pretty straightforward. Just change into the sample directory and kick off the docker build.

samples/1221-domain$ docker build -t enpit/samplewls:12.2.1-dev .
...
akmac2:1221-domain ak$ docker images
REPOSITORY                    TAG                 IMAGE ID            CREATED             VIRTUAL SIZE
enpit/samplewls              12.2.1-dev         3861d745a0bc        44 hours ago        1.739 GB
oracle/weblogic              12.2.1-dev         234ea4e45bc7        44 hours ago        1.738 GB
oraclelinux                  7.0                707f44423637        7 weeks ago         197.2 MB

At this point you have an image from that you can run weblogic containers. Having some Shell scripts included the image supports different types of containers to run. This is because of WebLogic Domain concept. See next Fig.


Run WebLogic AdminServer Container (the "Docker-Way")

Nothing easier then that:
akmac2:1221-domain ak$ docker run -d -p 8001:8001 --name=wlsadmin enpit/samplewls:12.2.1-dev
545cc33b8703586b1cc9098bbffe5d48ae6810c031c5104a8828b6718eb9fd03
akmac2:1221-domain ak$

The container starts the default command from the Dockerfile which in this case is "startWebLogic.sh"
(Providing a name is optional but it helps to better identify the running container)

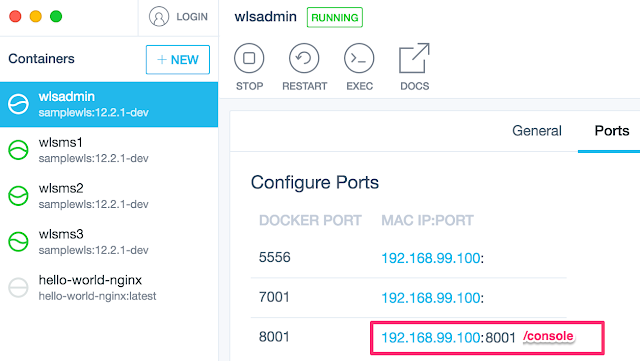
The easiest way to get the right IP / URL to access the Admin Console is looking at the Kitematic UI in the "Ports" Tab

So in my case I access the WebLogic Admin Console http://192.168.99.100:8001/console . Logging in with defaults weblogic / welcome1. With the above command you can now start as many AdminServers (in its own WebLogic Domain) as you want.

Extend WebLogic Domain with Managed Servers (Classical WebLogic Topology) 

Starting Managed Server Containers is also straightforward (if the Dockerfile is working for you. I had to make some modifications. See later)
akmac2:1221-domain ak$ docker run -d --name=wlsms1 --link wlsadmin:wlsadmin -p 7001:7001 enpit/samplewls:12.2.1-dev createServer.sh
bd8d53209781ea52096fba166fa6190b336366f3c0673b0a7452822a0e6d7a44
akmac2:1221-domain ak$

To add another managed server just run with different name parameter and map the container 7001 port to a different host (docker machine) port if you want to access the managed server directly
akmac2:1221-domain ak$ docker run -d --name=wlsms2 --link wlsadmin:wlsadmin -p 7003:7001 enpit/samplewls:12.2.1-dev createServer.sh
7389bfa89ffe0e07a286a9a88e3b0a3f30a77a33f464af4f8264efdc00ae7313
akmac2:1221-domain ak$
..

The createServer.sh Skript connects to the admin server, extends the domain by a machine (the container) and a managed server entry. Further it starts the NodeManager.

In the Admin Console you should notice the new machines and Managed Servers. (The managed server must be started manually; the createServer.sh Script is not doing it (Update 12/20/15: the scripts has been updated so managed server starts automatically)). In my sample I then have the following configuration

(Update 12/20/15: the following two issues might have been fixed in GitHub Repo)
Note: In order to make the above "createServer.sh" work for me I had to do the following modifications (and rebuilding the image of course)
(1) Issue: createServer.sh file not found ....
Adjust the sample 1221-domain/ Dockerfile.emptydomain.

Fix: I added the following underneath the statement "USER root"
RUN chmod +x /u01/oracle/*.sh && chown oracle:oracle -R /u01/oracle

(2) Issue: When the "createServer.sh-container" started and I try to start the managed server through Admin Console (that actually is done through the NodeManager) the process just hangs after a while... To fix that I modified the file
1221-domain/container-scripts/add-server.py:
Change the arguments for starting the managed server with additional argument.
..
arguments = '-Djava.security.egd=file:/dev/./urandom -
..
(It is a known "issue" on headless systems because of missing keyboard/mouse input entropy for random device)

Note: After making those changes and rebuild the "empty wls domain image" the "createServer.sh"-script worked as expected for me. But I noticed an increase in the image size from 1.7GB to 2.3GB. Not sure where it comes from. Maybe because I tried some other changes to make the Dockerfile work for me.  I need to investigate more and/or file an issue on that. 

Building an Java EE Application Image

Well, that's pretty straightforward. I took some existing WAR file from a tutorial (shoppingcart.war) and dockerized that app by creating a WLST Deploy script and of course a Dockerfile (that extends the WebLogic 12.2.1 Dev Domain Image)

Here is the Dockerfile:

And here the sample deploy WLST script:


Notice that the Admin Server is started during the build time in order to deploy to the AdminServer.
To build the sample Java EE application you need to run:
docker build -t enpit/shoppingcart:1.0-dev .

Now you have a dockerized simple Java EE application that you can run with

docker run -d -p 8001:8001 enpit/shoppingcart:1.0-dev

Composing and Running Multi-Container Applications

Well this should be a post for itself.  But to give you an impression for more complex scenarios: Typically you will run a database or more services that you WebLogic application is based on. Sure it is possible to link containers as shown in the previous sections but with more services it becomes a tedious task. Docker Compose helps to configure a multi-container environment that can simply be started with a single command: docker-compose up

The following docker-compose.yml file configures and links an oracle database-xe container and a weblogic container.

Here is the sample output docker compose provides (if running without -d option)
akmac2:1221-testds-app ak$ docker-compose up
Creating 1221testdsapp_oracledb_1
Creating 1221testdsapp_wlsadmin_1
Attaching to 1221testdsapp_oracledb_1, 1221testdsapp_wlsadmin_1
oracledb_1 | Starting Oracle Net Listener.

wlsadmin_1 | ..
wlsadmin_1 | ..
oracledb_1 | Starting Oracle Database 11g Express Edition instance.
wlsadmin_1 | ..
wlsadmin_1 | ..
wlsadmin_1 | Dec 16, 2015 10:19:14 PM GMT Notice WebLogicServer BEA-000360 The server started in RUNNING mode.

This should just give you an idea that simple Docker containers are just the beginning. With Docker Compose (and Docker Swarm) there is more to come.

Summary and Conclusion

Docker is fun and fast. It is easy to get started. The official provided WebLogic Dockerfiles on Github from Oracle help a lot to get started quickly. But be aware of that the Dockerfiles not meant to be perfect. Its an example how to get started and build your own WebLogic Docker images. The sample domain had to be adjusted otherwise the WebLogic JVM process did not start for me. But since the Dockerfiles are shared on GitHub it's easy to contribute. Bruno Borges and Monica Riccelli from Oracle are doing a great job in making all that to work and being certified by Oracle. Thank you guys!

For a long time WebLogic user it is untypical why port 8001 is used as default HTTP AdminServer Port. Why not running it on 7001 and use 8001 for Managed Server? or 7003, 7005 etc for managed server. ? (Note to me: Open an discussion on GitHub and fix that)

When running the ManagedServer (MS) type of container the MS is not started automatically. With some WLST scripting it could be improved I think.

Using docker-compose it should be possible to set up a cluster configuration and easily run it with: docker-compose up.

With Docker 1.9 Networking / Persistent storage capabilities and accordingly Docker Compose and Swarm has been greatly improved. This is great news. As it is going to allow Multi-Host WebLogic Cluster Containers. (Update 12/20/15: Multi-Host WebLogic Cluster Sample has been added in the corresponding GitHub Repo. Kudos to Bruno; great work!)

So there is still changes going on but in terms of simplification and improvement. I hope to see Docker Compose And Swarm for WebLogic working soon. But it will need some time because compose/swarm is sill experimental. There might be some networking issues at the moment of this writing.

Further information


Check out the presentation from DOAG 2015 (GER)

ADF Spotlight: REST in ADF 12.2.1

$
0
0
In the recent ADF Spotlight Webconference I have given a presentation and live demo on some of the new REST features in ADF 12.2.1. The recording (in german) is on youtube: https://www.youtube.com/watch?v=SmrINlqVNPs

The new REST features (to create REST resources) are implemented on top of Application Module (WebServices > REST). Here you can choose a Root View Instance, assign it to a release version and further configure the defined REST resource in a new Overview Editor.

Following summarizes some of the new REST features in ADF:

Resource Versioning

Versioning is the first thing need to be configured before you can start creating REST resources. It is supported at the level of the adf-config.xml file. Here you can define different versions. Each version can be configured as  active, deprecated or desupported. To keep things simple I recommend to use same name for internal and release name.


Versions marked as desupported will reply with HTTP 500  and corresponding message. They will not serve any REST Data.


Versions marked as deprecated will work. If you invoke the URL for v2 metadata you will get information that there is a successor-version:


It implements the HATEOAS principle and therefore is very developer friendly.

Read, Create, Update, Delete Out-of-the-box

By default all REST HTTP Methods are exposed on a resource. GET for read, POST for Create, DELETE for Delete. To partially update a resource (only some attributes e.g.)  the PATCH method is exposed.  For PUT you need to provide all attributes (It will do kind of a replace).

Important: When working with the REST API it is important to set the Content-Type to application/vnd.oracle.adf.description+json otherwise there will be the following exception:

oracle.adf.internal.model.rest.core.exception.CannotParseContentException: The PayloadParser could not be found in the ResourceProcessingContext.

See the following Postman PATCH sample:

Pagination for collections by default

Having a REST collection ADF automatically exposes parameters for pagination. Just append limit und offset as URL parameters and your good to go. see next pic to get a feeling how the parameters affect the response:

Children and LOVs as sub-resource

This is also a pretty great feature. 

By a simple configuration child view object instance will be exposed a sub-resources.


Configured LOVs on specific attributes will by default be exposed as sub-resources too. See example in postman:

Attribute Shaping

By default all attributes of a View Object will be exposed in the REST resource. If you want to expose only a subset of the attributes you can define "Service Shapes" on the View Object

and use those to customize the REST resource (Tab: Attributes)


Security

Securing ADF REST Resources is quite powerful. It works just like with Pages / Taskflow Permission. You just need to run the ADF Security Wizard on the RESTWebService project.

More features

Canonical Link

The canonical link is used to link to a resource that represents the full representation (of REST resource). This can be an "internal" defined View Object or an external (by pointing to the corresponding) ADF Connection.

See details in the Dev Guide: How to expose canonical Resources

RowFinder Key

With RowFinder configuration it is possible to change the URL of a resource from e.g. /employees/100 to /employees/SKING

Expose Custom Methods in the ADF REST Resource

To be evaluated ;) The ADF Documentation is not very clear about that topic.


--
Sample Code: https://github.com/enpit/enpit.sample.adf1221.restsandbox

Further information


Running Node.JS Apps and "Fat-JAR" Apps on Application Container Cloud Service

$
0
0

With the trend of container technologies going on it is great to see Oracle is providing the so called Application Container Cloud Service. Its current architecture is based on Docker and allows to run Java SE and Node.js applications in its current version. See the the following diagram


The Load Balancing, dockerizing and scaling is fully transparent. From developer perspective you are deploying a ZIP containing a manifest.json with a command property that states what should be executed once the deployment has been installed on the specific container.

In the following figure you see the overview screen of Application Container Cloud service (ACC).


Next lets create an app and deploy it to ACC. For Java SE lets see how that manifest.json looks like

Java SE App

The important properties are runtime / majorVersion and command. It states that the deployment needs Java 8. The application is started with the given "java -jar ..." command. Currently two working samples are provided, one works with embedded Tomcat the other works with Grizzly Http Server. Here is how a typical Main.java class would look like


The PORT and HOSTNAME are given from the environment. So it is in control of the application container cloud service.

Node.js App
For a Node.js app that manifest.json looks like

It expects a file server.js as the main entry point. There is an official Node.js sample application (together with a Tutorial). In my example I am going to create a connection to Oracle Database Cloud Service (via oracle nodedb driver) and expose DEPARTMENTS as a read online REST Resource.

The most interesting part here is how to retrieve the CONNECT String to the Database.

For testing on local machine defaults are used. Once deployed the CONNECT String is given as an environment property (beyond PORT, USER, etc).

Hint: All the JavaScript modules except native add-ons like node-oracledb should be included in the ZIP bundle.

Deployment
The deployment is quite straightforward from the ACC UI using the "upload application archive" option. Further you can provide initial values for number of "Instances" and Memory.

After about 5 min. the application is available through the Load balancer. For automated deployment a REST API exists.

To connect to other cloud services a service binding needs to be created first. The service binding creates environment variables that are available to every application instance.

Custom environment variables can be created. For example the schema user / password you want to connect with. Unfortunately just clear text values are accepted at the moment. Would be great to have a "secret type" for passwords. Further  # characters are not allowed (although my schema name is c##hr  ;) ).  Anyway it is no major show stopper.


See the sample service running in Postman


Logging / Diagnostics
Logs are stored on the Oracle Storage Cloud Service as a zip file. To look into the log files you have to download those ZIP files on your local disc first

For Java SE Apps a Flight Recording is possible.

Summary

The first public release of ACC looks quite promising. For the next versions my wishlist would contain
- Online Log Viewer
- Monitoring RAM / CPU Usage / Requests online
- Automatic Scaling
- Service discovery
- Security ?
- Adding environment variables of type "secret". (Currently you can only provide variables in clear text)
- Packaging improvements, maybe some mvn acc:install or CLI Tooling


Looking forward to new features in the future versions. There is potential for a modern microservice platform.

Samples Code
Explore the Node.JS sample code on https://github.com/enpit/enpit.sample.acc-node-hrapi
The Java SE jersey based code is available from Oracle.

Further Information

Walkthrough Oracle Application Builder Cloud Service - Create Table based on ADF BC REST Service

$
0
0
Oracle is making great progress in the Cloud. One of the recently released Cloud Services is the Application Builder Cloud Service (short: ABCS).

In this post I want to share my first impression in using ABCS for building modern web applications - responsive and optimized for mobile. For the backend I am using an exposed REST Service through ADF Business Components.

Prerequisites

You have created a new ABCS application.

Start with creating Business Objects on REST Resources

First open the Data Designer from the Hamburger-Menu. Choose New Business Object > Select from external service. The following Wizard shows up


Choose "Add Custom Services" and provide details to your REST resource. In this case a URL to the ADF REST Services descriptor is expected.


(For Authentication there are the following options: None, Basic, Oracle Cloud Account)
After submitting the form the REST service will be parsed. The containing resources are being shown in the next wizard step.


Select the "employee" resource and go to the next step to fine tune the naming, paths and child resources if available.


Go to the next screen to define so called Business Objects. That means choose/define just the specific attributes from the REST Resource you want to use in your app. (kind of similiar to creating ADF Business components from Database table). For the chosen fields you can further adjust data types or define defaults for the UI, e.g. Label Name. (compared to ADF these are "UI hints")

Finishing this last step the Business Object(s) are all setup to start building the UI.

Create table from Business Object

From the Data Designer switch to the Page Designer. (I am assuming here a page employees is already created).

Select Table from the Components Palette and Drag And Drop on the Page canvas. On the right side the Table Creation starts. Choose EmployeeBusiness Object


In the next step (Mapping) select fields you want to be used for the Table Columns. This is done by DnD from Available to Selected Pane.

The table will be readonly. With just some configuration options like 'Create on/off', Edit 'on/off', Edit Screen Title, 'Delete on/off' etc. you can let ABCS generate corresponding actions and Screens. The is a great feature for many typical use cases!

On the last wizard step you might want to configure Filtering, Sorting and further options like table summary for accessiblity.

Generated Edit form

As mentioned before when selecting to create the "Edit Action" ABCS generates the Edit form for you that you can further fine tune in terms of required fields, label positions, etc.


Conclusion

Oracle Application Builder Cloud Service feels like ADF for the cloud era. Having APIs as your backend (not coercively a DB) you model Business Objects which are the basis to wire the desired UI components.

The development experience is very smooth for basic UI development. For more advanced UI Logic custom JavaScript is needed. For reusable components Oracle JET (see blogpost) comes into play. All you need is a browser.

The resulting applications are being deployed with a push of a button on Test and Production Cloud Environments. Awesome!

Get Connected with the Community (Oracle JET and ABCS)

Be part of the ABCS Community and follow the ABCS Youtube Channel. Go to https://cloud.oracle.com/ApplicationBuilder for a trial account to get started.

Further Information

Oracle JET 2.1.0 released - for web and hybrid mobil app development

Viewing all 63 articles
Browse latest View live